Saturday, August 28, 2010

Starting Easy

As you can see below, the neck came out looking great after a good polishing.  Since it's an easy place to start, I'm going to seat the octave key pad and put the cork on the neck.


One of the great things about old instruments is the attention given to detail when designing them.  The brace on this neck, while not the most elaborate ever made, has a nice touch of style.  It almost looks like the crescent phase of the Man on the Moon.  Today, it seems like manufacturers tend to omit details like this in order to keep costs down.  Too bad!


The octave key pad went in really easy, as expected, and the key itself moves freely without much wobble.


My first attempt at installing the neck cork failed as the contact cement I was using didn't stick.  After a quick trip to the hardware store, I tried again with some industrial grade stuff.  Now, I don't think it will come off for another eighty years.


Here you can see the beveled edge that goes on the neck first.  Beveling it in this way makes for a smooth seam that will hold well.  Sanding the cork was a little difficult since I didn't have anything to hold it with, but it turned out okay.


Next time, seating pads...


Sunday, August 15, 2010

Polishing

Without any of the normal chemicals or dips used in a repair shop, I decided to try a couple of methods I found online to polish the silver plating.  The first used baking soda and worked surprisingly well on the keys.  Here are the before and after shots:


Baking soda worked surprisingly well!

For the horn itself, I simply let it sit in a tub of vinegar.  This also worked extremely well.


Here are the before and after photos of the bell:


To further polish the body and get into all of the hard to reach spots, I used a metal polish and an old T-shirt.  You can even see the camera reflected in the post below:


Not bad!  It's always really satisfying to see an old horn transformed by a good cleaning and polishing.  The contrast between the burnished and satin finishes, common on horns of this vintage, is especially striking.  Not only does it look great, it doesn't smell musty any more.  Now, all I have to do is keep my fingerprints off of it while I put it back together!

Thursday, August 12, 2010

Saxophone Gets a Bath

I as I mentioned this horn, like most old ones (1922), smells pretty musty.  As a first step in cleaning it, I put it in the sink and used dishwashing detergent and a tooth brush (no longer used on teeth, of course) to scrub it.  That took care of most of the really heavy stuff.  All of the pads and keys have been removed, so the water really can’t hurt anything.  It won't rust or tarnish because I’m going to dry it off with a hair dryer as soon as I’m done.

Now that some of the tarnish has been removed, you can better see where some of the plating has worn.  The case has a strap with a buckle on it that goes right around the bell.  That's most likely the reason for the wear here.


One problem that a I didn’t anticipate was the number of springs that had rusted loose.  I ended up collecting them in a small container, but I think a few are lost.  To prevent any more from falling out, I decided to pull the rest myself.  As shown in the previous post, most of them are blue steel "needle" springs which push against small notches on the keys.

Pipe cleaners help get into the really small parts.


Next deep cleaning and polishing...

Monday, August 9, 2010

Here it Goes!

The side and palm keys are generally the easiest ones to remove, so they’re coming off first.  Also, they are sometimes in the way of the two main key stacks.  It’s good to take note now, but order is going to be more important when putting Humpty back together.

The side F# key is removed in this picture.  Watch out for those needle springs; they can hurt!  - better make sure that Tetanus shot is up to date!


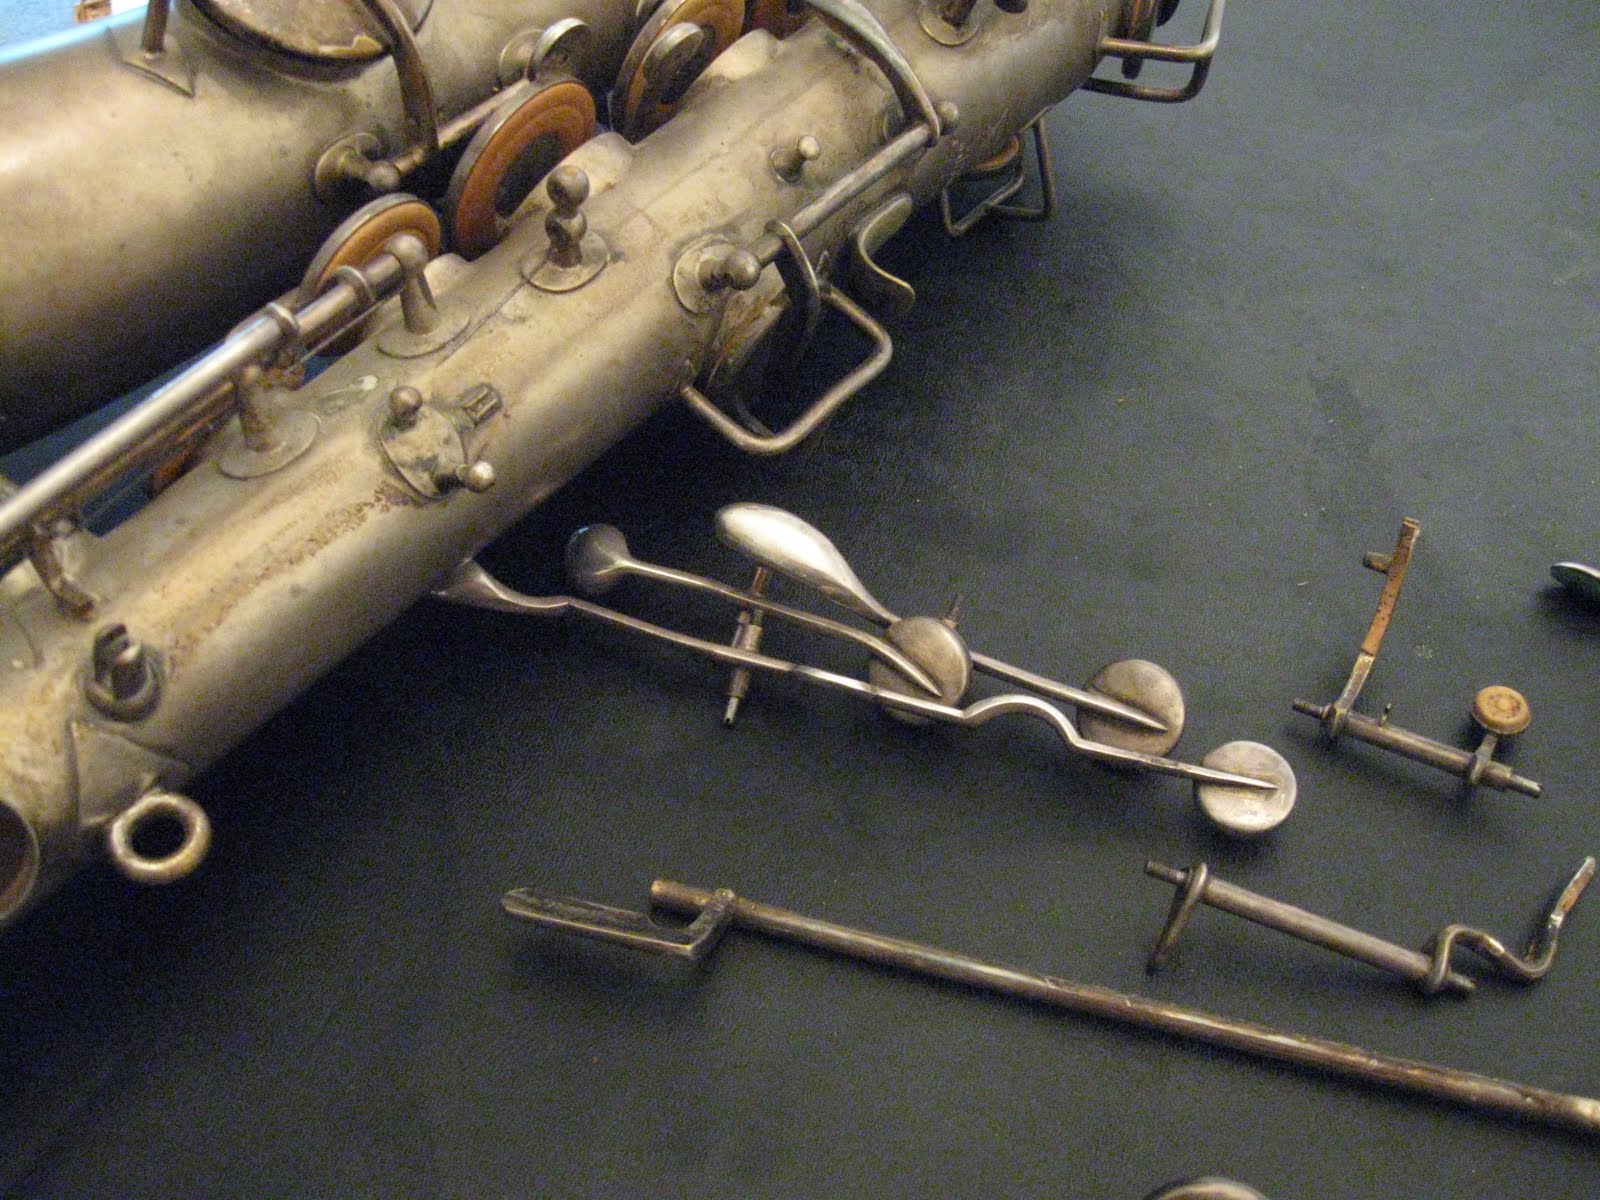
Here are the left hand palm keys, high E and part of the octave mechanism.  Note how the shape of the high D# in particular differs from modern horns.  It will be interesting to see how ergonomically this instrument will be to play.  The mechanism on Buescher horns is pretty consistent from this time through the sixties, so I imagine it won’t feel too unusual.  (They are also very similar the original “Bundy” saxophones which were essentially Bueschers stamped with a new name after Selmer acquired the company)  Finally, you can see the mangled octave mechanism (second from the bottom, on the right).  It shouldn't be too hard to straighten out, just another adventure...


Here’s a Close-up of the low C# key.  Behind it, you can see the alternate Eb trill key.  This, and the alternate G# trill are to vestiges that do not remain on modern horns.  If not set up properly, the Eb in particular can make the action feel “clunky”.


The Left Hand Stack in this case includes the keys for C, B, Bb, A and G.  Modern horns generally modeled after Mark VI's keep the Bb and G separate and on pivot screws.  The main advantage is that you don't have such a long rod running through so many posts.  This can lead to keys binding if things get knocked.  Also, it's easier fabricate, take apart and maintain if the entire stack isn't on one rod.  With the keys removed, you can see the exposed springs and tone holes.


With so many small parts, its absolutely essential that they are labeled and accounted for.  Loosing the wrong one would be akin to loosing a part off of that classic British racing car you’re restoring, not fun.


Pile ′O Keys


Pile ′O Pads


One special feature of old Buescher saxophones is the metal backing on the pads.  While most saxophone pads are held in place by shellac, these snap in similarly to flute pads.  Apparently they never need seating?  Right.  These snap pads pose a special challenge for whomever is replacing them.   To work properly, the pads must create and air tight seal on the tone holes.  Normally, heated shellac on the back of the pad (in the key cup) allows it to be “floated” into place and conform to the tone hole.  The key is then held closed and allowed to cool.  The shellac hardens and holds the pad in place.  In addition to the ridged backing, the snaps make floating the pads more difficult.  Since I’ll be using modern pads I’ll have to choose whether to use shellac anyway, or as I have in the past, use paper shims to seat them.


Well, now I have a pile of saxophone parts.  Overall, the keys came off very easily, with only a few needing a little WD40 to loosen their screws.  Next time, the saxophone gets a bath - seriously.


“I love it when a plan comes together!” (with apologies to George Peppard)

When fixing any old instrument, there are sure to be surprises - both good and bad.  I’m hoping that with my very limited shop, and the fact that I am frankly pretty rusty, none of them will be too tough.  A stripped or rusted screw, badly damaged tone holes, or broken keys can really be a hassle.
From the start, I knew this horn would require a complete re-pad and, most likely, more.  So, the plan is going to be:
  1. Disassemble the instrument and assess its condition
  2. Clean and polish the body and keys (and get rid of the musty smell!)
  3. Get the tools and supplies I need to fix it.  After all, I think I have a screwdriver and some contact cement right now.
  4. Fix it!
  5. Test it with the original mouthpiece and determine what size reeds will work
  6. Repair any oversights after having play-tested it
  7. Play some music!
After my C melody is completed, I plan on learning some of Frank Trumbauer’s music and getting a band together, so say tuned for recital dates!

Tuesday, August 3, 2010

The Good, The Bad and The Ugly...

There are actually quite a few C Melodies on Ebay, most in pretty good condition, but I was looking for a real "project," something that would satisfy my repair bug.  This Buescher from 1922 seemed to fit the bill - in need of some serious TLC, and similar to the one Frank Trumbauer is holding in the iconic photo of him.  So, I made an offer, and my new C Melody arrived a week or so after I won the auction.

The Good...

What's not to like about an old saxophone?  -the beautiful lines, the intricate engraving, the history, and, oh yeah, the funky smell.  Hey, this could have been Tram's own horn!  There are even some microphone nicks in the bell.


The Bad...

Gee, some packing peanuts might have been nice.  As I feared, the horn arrived with only a little paper around it and with nothing but a cardboard box around the case.


The Ugly...

Although the packing job didn't seem to have any harmful effects on the horn or case, there are some old wounds that need tending.


I wanted a project, and that is exactly what I got!  Overall, it's not really in terrible shape.  Most of the plating is still there and will polish up nicely.  Also, all of the snap-in resonators are there and the body isn't bent.  The dent in the bow is a pretty easy fix with the right tools.  The main problem with it is that, when it was hit, the fin was knocked off.  Stay tuned for the disassembly (intentional or otherwise) and cleaning.  I think my mold allergies are kicking in!


Inspiration

In ninth grade, I saw a C melody saxophone in an antique store in Durham, NC.  I was facinated.  A saxophone in C?  It looks like a tenor.  Can I play it in band?  I remember telling my high school band director about it and was met with a response that crushed my aspirations: “Don’t waste your money!”
Later, while in high school and college, I worked as an instrument repair man at Marsh Woodwinds in Raleigh.  Occasionally, someone would come in with a C melody and ask us if it was worth “fixing up”.  Our reply was usually something along the lines of “you could make it into a nice lamp...”  Despite my access to some really nice instruments, like a gold plated Conn, I never found the curiosity to play any of them.
Fast forward to the present.  While reading Bix: The Definitive Biography of a Jazz Legend by Jean Pierre Lion, I came across a saxophonist that I had little knowledge of, Frank Trumbauer.  His main instrument was the C melody.  Intrigued by what I read, I decided to listen to some of his and Biederbieck’s music.  Consequently, I was amazed at the virtuosity exhibited on some of the tracks, particularly on “Trumbology”.  On some of Trumbauer’s solo breaks, he double-tongues some of the arpeggiated passages.  Not just one note, but each note in the arpeggio is articulated at a very rapid speed.  Furthermore, I read Being Prez by Dave Gelly and found that Lester Young cited Trumbauer as his main influence, particularly his tone.  If Lester Young respected this musician to such a degree, I figured Tram (as he was nicknamed) was someone I needed to check out.
Having listened to Trumbauer, my desire to own a C melody was renewed. Not only did I want to learn about him and his music, but also do it on the actual type of instrument he played.  Of course, I could play any of the solos on tenor since the two instruments are only a step apart, but I wanted to learn more.  As a student of the saxophone and jazz history, I decided to explore these neglected areas of my education by “wasting my money” and buying a C melody sax.

Monday, August 2, 2010

"It's gonna be a thing..."


I've been threatening my friends for a few weeks that this blog was coming.  And so it begins!  This is the story of a really old, neglected C Melody Saxophone and its restoration.